


Theory of the "echo catcher"
The problem
The fuel/air mix entering the combustion chamber actually moves in an on/off fashion as it enters the engine. Not like a regular flow similar to pouring water from a glass, with the 'off' happening every time the piston raises, blocking the port. The fuel charge is still moving forward and hits that wall, creating a high-pressure pulse (like the ripple in a pool bouncing off the wall). That pulse "echo's" off the piston and moves back into the carburetor. The pulse travels through the carburetor again, picking up more fuel, causing a double rich mixture. The piston port then opens, and the energy (inertia) of the fuel traveling backwards now has to be overcome to get the fuel to go forward *again*, through the carburetor causing a double rich mixture which, in consequence turning into bogging, hard starts, and sputtering at top end.
The boost bottle's solution
A boost bottle gives volume (the space) for the pressure wave to dissipate before it re-enters the carb (hence the location of the inlet). The elimination of the double rich pulse is where the performance gains are to be found. This means a more accurate adjustability of the carb. The removal of the double mix is why you need to richen up engines that get bottles installed. Without a bottle, operators are forced to falsely lean engines to get performance from a naturally bad mix. Now, without the double mix, you can tune properly, which means more performance.1
For a more thorough look at the boost bottle and the theory behind it, see its article.
Installation
Tools needed:
- Drill
- 1/16 pilot hole drill bit
- Tap (appropriate size for the inlet fitting being used)
- Drill bit (appropriate size for the tap being used)
- Small crescent wrench
- Tie wraps
Mounting the bottle
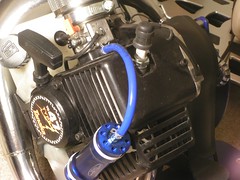
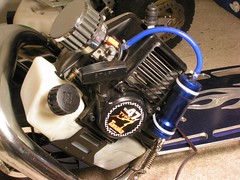
The bottle will need to be located securely above the cylinder to be installed correctly. The use of tie wraps can often give a secure mount to the scooter.
Installing the inlet fitting
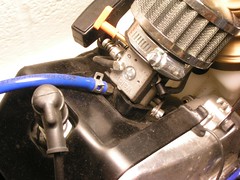
The inlet fitting, often supplied with the bottle, will be installed in the plastic manifold. The plastic manifold is the block located between the carb and cylinder. Remove the air filter giving access to the two bolts that secure the carb to the plastic manifold. After the carb has been removed, there is often two more bolts securing the plastic manifold to the cylinder. Remove these two bolts from the cylinder. Note: At this point it is not a bad idea to place a clean cloth over the open cylinder to insure nothing enters the cylinder.
You will notice there is a large hole in the middle of the plastic manifold. This is where the fuel/air mixture enter the cylinder during operation. It is this hole that we will tap with our inlet fitting. Be sure to locate the inlet fitting where it will not interfere with any other component on the engine. The last thing you want to happen is to install the inlet fitting only to realize it is in the way of something else.
Once you have arrived at a suitable location for the inlet fitting, put the 1/16 pilot hole drill bit into the drill. Carefully drill the pilot hole in the desired spot in one side of the plastic manifold. Drilling with this smaller bit will allow for a more accurate placement of the tap. Now, put the appropriate size tap drill bit into the drill and carefully drill the new hole through the pilot hole. Place the tap into a tap handle being sure to put the tap straight up and down from the plastic manifold. Slowly proceed to turn the tap clockwise while applying some pressure to the tap. Take your time here so as not to mess up the new threads. Remember, this is plastic and could easily be destroyed. Once you have run the tap in far enough simply back it out all the way.
The inlet fitting should be fitted with an o-ring. This is critical to avoid any leaks and must be installed. Take the small crescent wrench and adjust it to the correct size for the inlet fitting. Slowly start the fitting into the newly created threads being sure not to cross thread the fitting. Warning: DO NOT OVER TIGHTEN THE FITTING! Remember, this is plastic. When the o-ring is compressed and the fitting is a bit more than hand tight this will be enough.
Simply take the supplied 1/4"rubber hose and neatly route it from the bottle to the inlet fitting. Be sure not to make any extremely sharp bends in the hose. You do not want to impede the flow of air/fual mixture from the bottle.
Retuning the carb
The idle screw will need to be adjusted to a lower idle and the high and low screws adjusted to a richer setting. (see Tune your Carb)2


